Nitendo Games May Be Available On Android

Nitendo Games May Be Available On Android
How many of you remember the game "Mario Bros."? I know a lot of people have played the Mario and many people have been asking them to make the classic Nintendo Games for the smartphones. But there is no game available in the PlayStore for Android or iTunes for iOS.


Nintendo has filed a patent on the Gameboy emulator back in June and it has been approved in November. So we will get the Nintendo games on our smartphone? Don't get too excited. There are two possibilities:

First, they may be porting the games for the smarphones and regain their position in the gaming industry as they have been held back by the PlayStation 4 and XBox One.

Or, they might be filing the patents so that they can prevent the use of emulators in Android devices and in case of iOS they will taken down as soon as the Apple review team is aware of the funtion.


"Our games such as Mario and Zelda are designed for our game machines so if we transfer them into smartphones as they are, customers won't be satisfied. If customers aren't satisfied with the experience, it will decrease the value of our content," said Nintendo president Satoru Iwata in a May interview with Bloomberg.

Again this is not a new patent as they have applied the patent in 2000 and in 2008 and 2012 and this is just another derivative of those.

NVC: Night Vision Camera for iPhone 6 And 6 Plus

NVC: Night Vision Camera for iPhone 6 And 6 Plus
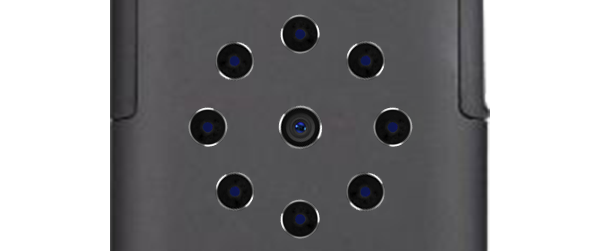
Once the original iPhone was opened up to third-party apps, it added an incredible amount of additional functionality to the device. So the NVC promises to give the iPhone 6 the ability to see in complete darkness.

There are lots of apps that claim to give smartphones night vision, but they're just using software tricks to boost what little light a phone's camera sensor can gather. The NVC iPhone 6 and 6 Plus case instead brings its own 720P video camera that's surrounded by a ring of eight infrared LEDs to illuminate objects up to 30 feet away, even when there's no visible light available.

The NVC case connects to your iPhone via WiFi, and packs its own 2,000-mAh battery good for at least a couple of hours of use so as not to nuke your phone's own battery. And because it's self-powered with a microSD card slot for storage, the case can even be used as a standalone remote camera that streams what it's seeing back to your handset.
The infrared light built into NVC can penetrate through some pigments and let you see through some materials. We have run some experiments with this and found that we could see through some plastics, liquids and inks. You can run your own experiments as well.


The creators of the NVC are using Kickstarter to help raise the necessary funds to put the night-vision case into production, and for the time being you can pre-order with a donation of $129. That gets you one of the first pre-production units as early as May of next year, but that's assuming the development of the prototypes and hardware is completed on schedule.
Unfortunately this is not available for the android user currently and I think it may not come to any android phones as there are a lot of different models currently available for the android. But wait, who knows? It may be available for some android phones :D
So while the production version will be priced closer to $200, it might be worth waiting until the NVC is officially available before ordering one. Unless you have a desperate need for night vision on your phone, and refuse to just turn on its camera's flash as a makeshift flashlight.

BackUp And Restore An Android Device

BackUp And Restore An Android Device

Each time you decide to perform operations on your Android powered device the data saved on its storage memory or even on its SD card might be wiped out. Furthermore, if you want to do things more complicated like flashing a custom ROM, install unofficial updates, or beta firmware, you can wreck (brick) the phone’s system. But, there is a way in which you can avoid all these unfortunate aspects. You can make a full backup before starting the main process; and I’m not referring to any backup as you should save your current ROM first.
This is exactly what we will be checking during the present step by step guide: how to backup and restore your Android device before installing custom ROMs, or applying unofficial updates. And the perfect way to do it is by using the ClockWorkMod Recovery custom recovery image. With this you can backup the current ROM that is running on your phone, so in case if something goes wrong while trying to flash a new ROM into the system you will be able to revert and use the old software. This is the perfect method to use for avoiding bricking your smartphone.
As you know, the warranty is void each time you want to complete one of the up mentioned operations, so backing up the software is no longer an option for you. Anyway, you need to get ClockWorkMod Recovery first. If you don’t know CWM is a custom recovery designed to work on the Android platform and offer different capabilities to the users like: making backups, test custom ROMs, perform maintenance operations and so on.
Now let’s head to the proper guide. Make sure you read all the lines for understanding the concept and for completing a full and safe backup of your ROM. Also you will learn how to install and use CWM, so don’t skip sections of the tutorial.

How to Backup and Restore your Android device Using ClockWorkMod Recovery

  1. First, you should root your device as you cannot install ClockWorkMod Recovery on an un-rooted handset. Click here so that you can find a how to root guide suitable for your device.
  2. Then you should know that not all the smartphones are being able to support the tool. So, before starting to do something, check here and see if your phone is on the list.
  3. Then, after checking the compatibility and rooting the handset you must go on Google Play and search for the ROM Manager app.
  4. Install the same.
  5. Then open the tool.
  6. Select the “flash ClockWorkMod Recovery” option.
  7. Then, just select “Backup Current ROM” and follow the prompts.
  8. The backup will be completed once you reboot the smartphone.
  9. Now, if you decide to install a custom ROM into the system and something wrong happens just restore the backed up firmware by opening the app again and choosing “Manage and Restore Backup” and then “Restore”.
  10. You will have the old OS as soon as you reboot the device.

So, there you have it; that’s how you can backup the current ROM before flashing a custom ROM, or update your Android device with an unofficial firmware, and this by using the ClockWorkMod Recovery tool. If you want to backup the rest of the files from your handset too, you can use other apps, or methods. In this way you can save your personal info whether it is about messages, contacts, calendar saves, Market apps and who knows what else.

How to Install A Custom ROM on Any Android Device


The Android OS is the most popular mobile operating system used on most of the smartphones and tablets out there. Of course the battle between Android and iOS, or should we say Google and Apple, if far from over, though both platforms are coming with great features and advantages for us, the gadgets addicted.
The best about Android is the possibility of customizing and optimizing the firmware and through this, the possibility of powering up the performances of our devices. Today, I will teach you how to tweak your Android handset by updating with a custom ROM software. This is a general tutorial that can be applied on any Android based smartphone / tablet, so read the following lines if you are new to Android or if you want to learn everything about custom ROMs and how to install the custom updates.
When talking about custom ROMs, in your mind there should be only one thing: you are dealing with an unofficial port of the Android system, so the same is not an OTA (Over the Air) or official update released by Google for your Android device. That’s why the custom ROMs can be applied only manually and only by following dedicated step by step guides.
Regarding the up mentioned aspects, root access will be required if you want to update your smartphone / tablet with a custom firmware. Root means that you will gain access to the internal system of your handset by removing the factory and default restrictions. By rooting you will unchain the OS thus you will be able to remove in build apps and programs, add new features, install complex tools that requires root access in order to run properly, upgrade the battery life, improve the speeds and so on. Most important, a custom ROM can be flashed only on rooted Android devices.
The root operation is also unofficial so the warranty of your smartphone / tablet will get void. You can’t avoid this aspect (because of the up-mentioned details) so you will have to get through this without messing things up – you can end up in bricking your handsets. So, do follow dedicated step by step guides when trying to gain root access. Afterwards, if you don’t like the Custom ROM firmware that is running on your phone, if you want to apply an OTA on your device (on rooted handsets the official Android updates can’t be received or installed – you can apply the OTA only manually), or if you want to restore the lost warranty, you can do the same by downgrading your handset to stock Android OS, or by revoking the root access (again use suitable tutorials).
Now, leaving these aspects aside (I will detail the pre requisites a little bit later) let’s see what a custom ROM really is. Well, an unofficial version of the Android software is a free aftermarket distribution of the Android platform that comes with stock and extra features, apps, tools and capabilities. Usually a custom ROM is coming with its own looks and features so that’s why you can improve the performances of your device – do note with custom firmwares you will not receive the default Android looks and capabilities. The custom ROMs are being developed by third party devs and the platforms are based on the official / stock Android systems.
If you want to update your device with such firmware you should know that the most popular ROMs that are used by the Android users are: ParanoidAndroid, SlimBean, AOKP, CyanogenMod, MIUI and Omega. Don’t worry you can choose any other update as long as you are ensuring that the system is stable and without bugs or things that aren’t working properly.
The custom updates might come with custom kernels which means that you can afterwards learn how to overclock your Android device for improving the speeds, or underclock for upgrading the battery life (we have suitable guides here on Android.gs). Besides, on custom ROMs you can make easier backups, you can change the looks, add apps from outside the Google Play coverage and lot more.
But if you want to successfully update your Android device with an unofficial firmware, you will first have to prepare your gadget, or else you will probably end up in bricking your handset. Below I have listed the most common preparation tasks that are required when dealing with custom ROMs like ParanoidAndroid, SlimBean, AOKP, CyanogenMod, MIUI and Omega.

  • Install a custom recovery image on your device – you can use any recovery tool you want though it is recommended to flash CWM or TWRP recovery. The custom recovery will be used on the flashing operation as the stock recovery that comes pre-installed on Android can’t be used on unofficial procedures.

  • Backup the data which is saved on the internal storage memory of your handset; save everything you might need including text messages, call logs, internet settings, market apps and so on. Also, consider in making a Nandroid backup for saving the current software.

  • For these operations (update with custom ROMs) a computer is being required along with your smartphone / tablet and with the USB cable.
  • On both devices and computer you should first deactivate the security protection; the antivirus programs are usually interfering with the update operation.
  • Your device must be charged especially if the battery status indicates less than 60% power left; the handset might get bricked if it gets turned off while you are trying to install the custom firmware.
  • On your phone the USB debugging option must be enabled: “Settings -> More -> Development Options -> USB debugging”.

  • How to Install Custom ROMs on Android devices (universal guide)


  1. First of all, on your computer you need to download the proper update file.
  2. Optional: download the Google apps package if it is not included on the firmware file.
  3. Save the files on desktop; don’t unzip them.
  4. Then, connect your handset with the computer.
  5. Establish the connecting by using the USB cord.
  6. Copy-paste or drag and drop the downloaded files from desktop to your phone’s (tablet’s) SD card.
  7. Disconnect the devices by unplugging the USB cable.
  8. Turn off your smartphone / tablet and wait a few seconds.
  9. Then reboot your gadget into recovery mode.
  10. Next, navigate through the recovery mode menu and select “wipe data factory reset”, “wipe cache partition” and “wipe dalvick cache”.
  11. The system will now be wiped out, so that’s why the backup has been recommended before.
  12. Up next, return to recovery main menu: select “+++go back+++”.
  13. And choose “install zip from SD card” and “choose zip from SD card”.
  14. Pick the update file and flash the same.
  15. Optional: repeat this operation for applying the Google Apps package.
  16. When the installation process ends, from recovery select “+++go back+++” and “reboot system now”.
  17. You are done.


  • Troubleshooting:


  1. Reboot in recovery once more.
  2. From there select “wipe data factory reset” and “wipe cache partition”.
  3. Return and reboot.
Optional: if needed now you can restore the previous software (only if you had made a Nandroid backup as indicated). So, use the recovery menu and select “backup and restore”.


Now, be careful as each custom ROM comes with a version that is suitable only with one device; you can’t install the same variant of firmware on all the Android devices as the same is not compatible. So, download only compatible ROMs; don’t risk in bricking your handsets. Good, next we will be checking on how to apply the updates on your devices; do note though that this is an general tutorial.
In some cases after flashing the custom ROM, when rebooting the first time, your handset might get stuck in a boot loop (if the first boot takes longer than usual, don’t panic, there is nothing wrong with your device); if that happens, follow:
So, that was it, now you know almost everything about custom ROMs for Android and how to install such a firmware on your smartphone or tablet. Remember to choose only the stable platforms that come with important features and capabilities. In this way you can speed up your handsets and improve the performances for receiving better results and an upgraded web browsing experience. If you want to talk with us or if you have something to share with our team, don’t hesitate and use the comments area from below.

Google's Material Design + Linux = Quantum OS


Do you love the latest Android Lollipop's material design? You want that design in your desktop? Then the time might have come. It's the Quantum OS that tries to bring Android's Material design to the linux desktop.


This linux is built entirely from the scratch using a powerful language QML.  The reason for this is that we want to be able to focus specifically on implementing Material Design, which has several unique features, such as the concept of elevation.


This OS is currently planned to be developed from an existing operating system, most likely from Ubuntu or Arch Linux. But Arch Linux has a strong possibility because of it's features.

The man behind this idea is Michael Spencer, and they also have a Google+ page Quantum OS.

The code is currently being hosted at https://github.com/quantum-os, with the Material Design QML framework hosted at https://github.com/quantum-os/qml-material.

As it is in development we have to wait some time to get our hands on it.

What do you think about this idea? 

Share this post with your friends by smashing that Share button below.

Browse through Facebook Using Only your KeyBoard

Browse through Facebook Using Only your KeyBoard


Recently I was using my facebook account and I accidentally pressed many keys on the keyboard. A pop up screen was shown asking "Like this content?" and I didn't understand why was it asked.

And then I pressed every keys on the keyboard to find out that facebook can be browsed without using our mouse. How cool is that? For lazy person like me it will be useful that I can use the whole facebook without having my hand to move.

Here are the list of command:


Replace # with the access key number listed below.
  • Internet Explorer for PC: Alt + #, then Enter
  • Firefox for PC: Shift + Alt + #
  • Chrome for PC: Alt + #
  • Safari for Mac: Ctrl + Opt + #
  • Firefox for Mac: Ctrl + Opt + #
  • Chrome for Mac: Ctrl + Opt + #

Access Keys

  • 0 - Help
  • 1 - Home
  • 2 - Timeline
  • 3 - Friends
  • 4 - Inbox
  • 5 – Notifications
  • 6 – Settings
  • 7 - Activity Log
  • 8 - About
  • 9 - Terms


Keyboard Shortcuts


  • j and k - Scroll between News Feed stories
  • p - Post a new status
  • l - Like or unlike the selected story
  • c - Comment on the selected story
  • s - Share the selected story
  • o - Open attachment of the selected story
  • / - Search
  • q - Search chat contacts
  • ? - Open the list of keyboard shortcuts while in News Feed
Have you tried this before? or Will try this?

Is it cool or just another boring stuff? Tell me in the comments.

If you like this then why not share it with your friend.

Turn your Gif animations into your phone's Boot Animation

Turn your Gif animations into your phone's Boot Animation
Are you sick of seeing your phone's brand name on your bootscreen. Yeah you should be!!!

Now this user from reddit.com eth0izzle have created something different that will turn all your gif animations into your phone's boot animation.

Imagine how cool that would be......

What if you had a boot animation like this......


If you want this then click here.

1.Enter the frame size of your phone.
2.Enter the frames per second of your gif.
3.Then upload your gif.
4.And select Flash the bootanimation.zip to download the zip.
5.Once you've got the zip goto /system/media and paste it there.


Note:
- This is in alpha stage and this may cause some errors with some gifs.

What gifs will you have in your phone as boot animations, tell me in the comments.

If you like this then just share it with your friends.